U-Boot
This guide will help you through the steps to build a U-Boot image for your desired platform.
Prerequisites
All of the common prerequisites apply.
Requirements
- Access to an embEDUx buildserver system
- User Documentation.
- At the end of the setup, the Administrator is instructed to create the User Documentation.
- Your platform needs to be included in the User Documentation, if that isn't the case, please contact an Administrator to add your platform to the embEDUx build system.
-
uboot-specs Git-Repository
The U-Boot-specification is supplied to the buildserver via git. Consult your User Documentation for the repository URLs. (See previous link)
Suggestions
-
Build/download a toolchain. This will allow you to test your build configuration locally before you push it upstream. For further information have a look at Local Testing.
-
Have a look at the default build scripts (generic, platform). As the buildserver just executes these scripts, you have no limits on what you want to do before, during and after the build process.
Branch Name-Scheme
The builserver can only build your images, if you follow the correct name-scheme for the branches.
The variables that are needed for your platform can be found in the User Documentation.
Variables
| Variable | Notes |
|---|---|
| Platform-String | Specified and mapped to the target architecture by the Administrator. Found in the User Documentation |
| Uboot-Version | The U-Boot version |
Branches
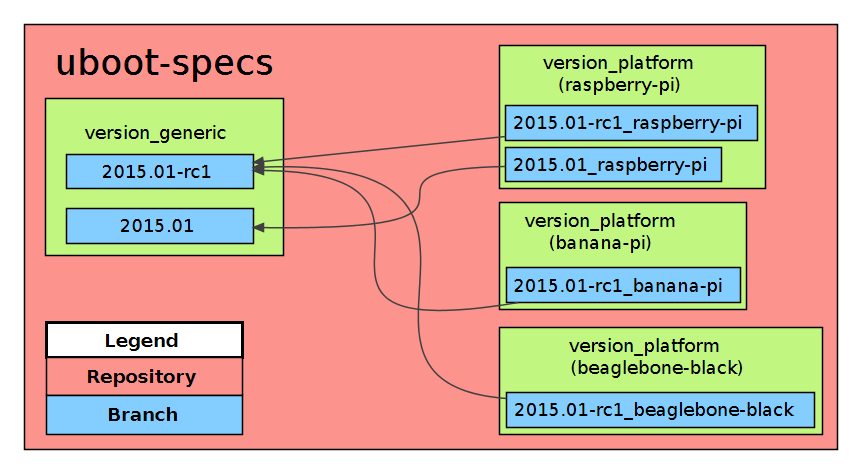
To avoid unnecessary redundancy, which will naturally occur if you build multiple platforms for the same kernel version, following branch structure is necessary. The default build scripts (generic, platform) follow exactly this idea.
| Branch | Dependency | Task |
|---|---|---|
| version_generic | platform independent | Provide U-Boot sources |
| version_platform | platform dependent | Call build script in version_generic branch |
For each U-Boot version, there will be exactly one version_generic branch, where for each platform there will be one version_platform branch. Following name-scheme has to be followed.
| Branch | Scheme | Example |
|---|---|---|
| version_generic | < uboot-version > | 2015.01 |
| version_platform | < uboot-version >_< platform-string > | 2015.01_raspberry-pi |
Step-by-Step Example
The following example will give you a detailed overview of the necessary steps to build U-Boot 2015.01 for the raspberry pi. We assume that at this point the uboot-specs repository is empty.
Add New Upstream U-Boot
Before you can add a new platform, for which you want to build a U-Boot image, you first need to add a version_generic branch to the uboot-specs repository.
-
Clone the uboot-specs repository with the URL provided in the user documentation.
$ git clone git@apu.in.htwg-konstanz.de:labworks-embEDUx/uboot.git -
Add a version_platform branch to the uboot-specs repository.
$ git checkout master $ git branch 2015.01 $ git checkout 2015.01 $ touch README.md $ git add README.md $ git commit -m "inital commit" $ git push --set-upstream origin 2015.01 -
Add the default script as build to the branch and make it executable.
$ ls -hltotal 4.0K -rwxr-xr-x 1 user user 1.1K Mar 2 18:49 build -rw-r--r-- 1 user user 0 Mar 2 18:48 README -
Modify <uboot-file > in the build script, to match the U-Boot archive for the desired version. If you use the default build script, make sure the file exists on the ftp server.
... UBOOT_FILE="u-boot-2015.01.tar.bz2" ... -
Before you push your changes upstream, make sure the build script is running without any errors. If you need help, have a look at Local Testing
-
Add your changes, commit and push them upstream.
$ git add build
$ git commit -m "new uboot 2015.01"
$ git push
Now that you have a version_generic branch for your desired U-Boot version within your uboot-specs repository, the next step is to add a version_platform branch.
Add new platform
This step requires an existing version_generic branch for the desired U-Boot version, you want to add a platform.
-
If not already done, clone the uboot-specs repository with the URL provided in the user documentation.
$ git clone git@apu.in.htwg-konstanz.de:labworks-embEDUx/uboot.git -
Add a version_platform branch to the uboot-specs repository. It is necessary that you push the branch at this point upstream, so the buildserver can find this new version_platform branch.
$ git checkout master $ git branch 2015.01_raspberry-pi $ git checkout 2015.01_raspberry-pi $ touch README.md $ git add README.md $ git commit -m "inital commit" $ git push --set-upstream origin 2015.01_raspberry-pi -
Add the default build script as build to the branch and make it executable.
$ ls -hltotal 4.0K -rwxr-xr-x 1 user user 431 Mar 2 18:59 build -rw-r--r-- 1 user user 0 Mar 2 18:57 README -
Modify < uboot-version > to the desired version_generic branch. Then modify < def-config > to the platform configuration for U-Boot. In this case we expect a default configuration for you platform within the U-Boot source. If this isn't the case, please read further informations at background/uboot.
... UBOOT_VERSION="2015.01" UBOOT_CONFIG="rpi_config" ... FIRMWARE_IMG="u-boot.bin" ... -
Optional: Add pre_output or post_output functions to the build script. They will be called before and after the output is packed. For further information check background/implementation/uboot or have a look at the default build script.
-
Before you push your changes upstream, make sure the build script is running without any errors. If you need help, have a look at Local Testing
-
Add all changes, commit and push them upstream.
$ git add build $ git commit -m "new platform" $ git push -
The Buildserver should start building your U-Boot image now. For further informations on how to monitor the build check monitoring guide.
-
Congratulations, you just built your first U-Boot for your first platform.
Be aware that you might still need some necessary files on your boot and root partition to boot your system successfully. See misc for the necessary steps.
If you have a linux, a rootfs and the necessary misc files, you can flash everything with the Flashtool or deploy your files manually (see Hardware Deployment).
